

How To Check Tensorflow Installation
referenced from Installing Tensorflow in official site of tensorflow
In my computer, I will follow Installing Tensorflow on Ubuntu
Because my environment is Ubuntu16.04 LTS, I also decided to install tensorflow every bit native pip.
subsequently following this whole processing, probably you can install tensorflow anywhere.
Les't play!
Offset of all, you need to install pip or pip3.
basically, the pip or pip3 package director is usually installed on Ubuntu.
Simply, if you didn't install them.
type in like this :
sudo apt-get install python-pip python-dev # for Python 2.7
sudo apt-get install python3-pip python3-dev # for Python 3.n
if you run into the post-obit issue,
hyunyoung2@hyunyoung2-desktop:~$ sudo apt-get install python-pip Reading package lists... Done Edifice dependency tree Reading state data... Done E: Unable to locate package python-pip you lot need to update package list
sudo apt-get update
hyunyoung2@hyunyoung2-desktop:~$ sudo apt-go update Get:1 http://united states of america.annal.ubuntu.com/ubuntu xenial InRelease [247 kB] Get:ii http://security.ubuntu.com/ubuntu xenial-security InRelease [102 kB] Get:3 http://us.archive.ubuntu.com/ubuntu xenial-updates InRelease [102 kB] ...... plus, if you upgrade your software version to the latest version. it is much improve.
sudo apt-get -y upgrade
hyunyoung2@hyunyoung2-desktop:~$ sudo apt-get -y upgrade Reading package lists... Done Edifice dependency tree Reading state information... Done Calculating upgrade... Washed The following parcel was automatically installed and is no longer required: snap-confine Employ 'sudo apt autoremove' to remove it. The following packages have been kept back: gnome-software gnome-software-common libmirclient9 linux-generic-hwe-16.04 linux-headers-generic-hwe-16.04 linux-image-generic-hwe-sixteen.04 python3-software-properties software-properties-common software-properties-gtk ubu ..... pip
From now on, I am explaining to you nether installing the above update or upgrade.
sudo apt-go install python-pip python-dev # for python two.7
sudo apt-go install python3-pip python3-dev # for python iii.northward
Keep in mind that as of now(2017.06.27) the official site of tensorflow strongly recommend version 8.ane or higher of pip or pip3.
if yous already installed i of the above them. y'all got the following screen
- python-pip python-dev
hyunyoung2@hyunyoung2-desktop:~$ sudo apt-get install python-pip python-dev [ sudo ] password for hyunyoung2: Reading package lists... Done Building dependency tree Reading state data... Washed python-dev is already the newest version (2.vii.11-i) . python-dev prepare to manually installed. python-pip is already the newest version (8.one.1-2ubuntu0.iv) . The following package was automatically installed and is no longer required: snap-confine Utilize 'sudo apt autoremove' to remove it. 0 upgraded, 0 newly installed, 0 to remove and 10 not upgraded. - python3-pip python3-dev
hyunyoung2@hyunyoung2-desktop:~$ sudo apt-get install python3-pip python3-dev Reading package lists... Done Edifice dependency tree Reading state information... Done python3-dev is already the newest version (3.5.1-3) . python3-dev set up to manually installed. python3-pip is already the newest version (8.1.i-2ubuntu0.4) . The following parcel was automatically installed and is no longer required: snap-confine Use 'sudo apt autoremove' to remove it. 0 upgraded, 0 newly installed, 0 to remove and ten not upgraded. Finally,it'southward time to install tensorflow under installing prerequisite software like pip or pip3 and and then on
In social club to install tensorflow, choose one of the post-obit commands.
pip install tensorflow # Python 2.7; CPU support (no GPU support)
pip3 install tensorflow # Python 3.n; CPU support (no GPU support)
pip install tensorflow-gpu # Python 2.seven; GPU support
pip3 install tensorflow-gpu # Python 3.n; GPU back up
In my case, I decided to install tensorflow-gpu, considering I bought the graphic care in order to run tensorflow on graphic card
- pip install tensorflow-gpu
hyunyoung2@hyunyoung2-desktop:~$ pip install tensorflow-gpu Collecting tensorflow-gpu Downloading tensorflow_gpu-ane.ii.0-cp27-cp27mu-manylinux1_x86_64.whl (89.2MB) 100% |████████████████████████████████| 89.2MB 20kB/s ........ Successfully congenital markdown html5lib Installing nerveless packages: half-dozen, funcsigs, pbr, mock, numpy, markdown, html5lib, bleach, wheel, setuptools, protobuf, backports.weakref, werkzeug, tensorflow-gpu Successfully installed backports.weakref bleach funcsigs html5lib-0.999 markdown mock numpy-1.11.0 pbr protobuf setuptools-xx.7.0 half-dozen-ane.10.0 tensorflow-gpu werkzeug wheel-0.29.0 You are using pip version eight.one.1, notwithstanding version 9.0.ane is available. You lot should consider upgrading via the 'pip install --upgrade pip' control. - pip3 install tensorflow-gpu
hyunyoung2@hyunyoung2-desktop:~$ pip3 install tensorflow-gpu Collecting tensorflow-gpu Downloading tensorflow_gpu-ane.ii.0-cp35-cp35m-manylinux1_x86_64.whl (89.2MB) 100% |████████████████████████████████| 89.2MB 23kB/s ........ Successfully built html5lib markdown Installing collected packages: half-dozen, setuptools, protobuf, html5lib, wheel, bleach, numpy, backports.weakref, werkzeug, markdown, tensorflow-gpu Successfully installed backports.weakref bleach html5lib-0.999 markdown numpy-1.xi.0 protobuf setuptools-xx.7.0 vi-1.10.0 tensorflow-gpu werkzeug wheel-0.29.0 You lot are using pip version eight.1.1, all the same version ix.0.1 is available. You should consider upgrading via the 'pip install --upgrade pip' control. Implementation of TensorFlow
Now, if you are done until the higher up processing, let's cheque if tensorflow works well.
python -c "import tensorflow as tf; impress (tf.__version__)" # for Python ii.7
python3 -c "import tensorflow equally tf; impress (tf.__version__)" # for Python 3.0
Every bit of now, tensorflow doesn't work. I think I didn't install some files related to GPU
Then after prompt the above command, you got the following :
- python -c "import tensorflow as tf; print (tf.__version__)" # for Python 2.7
hyunyoung2@hyunyoung2-desktop:~$ python -c "import tensorflow as tf; print (tf.__version__)" Traceback (most recent call final): File "<string>", line 1, in <module> ........ ImportError: libcusolver.so.8.0: cannot open up shared object file: No such file or directory Failed to load the native TensorFlow runtime. See https://www.tensorflow.org/install/install_sources#common_installation_problems for some mutual reasons and solutions. Include the entire stack trace above this error message when asking for help. - python3 -c "import tensorflow as tf; print (tf.__version__)" # for Python three.0
hyunyoung2@hyunyoung2-desktop:~$ python3 -c "import tensorflow as tf; print (tf.__version__)" Traceback (most contempo call final): File "/home/hyunyoung2/.local/lib/python3.v/site-packages/tensorflow/python/pywrap_tensorflow.py", line 41, in <module> from tensorflow.python.pywrap_tensorflow_internal import * File "/home/hyunyoung2/.local/lib/python3.five/site-packages/tensorflow/python/pywrap_tensorflow_internal.py", line 28, in <module> _pywrap_tensorflow_internal = swig_import_helper() File "/dwelling house/hyunyoung2/.local/lib/python3.five/site-packages/tensorflow/python/pywrap_tensorflow_internal.py", line 24, in swig_import_helper _mod = imp.load_module( '_pywrap_tensorflow_internal', fp, pathname, clarification) File "/usr/lib/python3.v/imp.py", line 242, in load_module return load_dynamic(name, filename, file) File "/usr/lib/python3.5/imp.py", line 342, in load_dynamic render _load(spec) ImportError: libcusolver.and then.8.0: cannot open shared object file: No such file or directory During handling of the above exception, some other exception occurred: Traceback (near recent call last): File "<cord>", line ane, in <module> .......... ImportError: libcusolver.so.8.0: cannot open up shared object file: No such file or directory Failed to load the native TensorFlow runtime. See https://world wide web.tensorflow.org/install/install_sources#common_installation_problems for some common reasons and solutions. Include the unabridged stack trace higher up this error message when request for assist. if you await into fault message, you can verify what mistake is, where you could resolution about the avoe error(ImportError: libcusolver.so.8.0: cannot open shared object file: No such file or directory
Equally yous saw a line which is "See https://www.tensorflow.org/install/install_sources#common_installation_problems"
If you access the above link, you got the following :
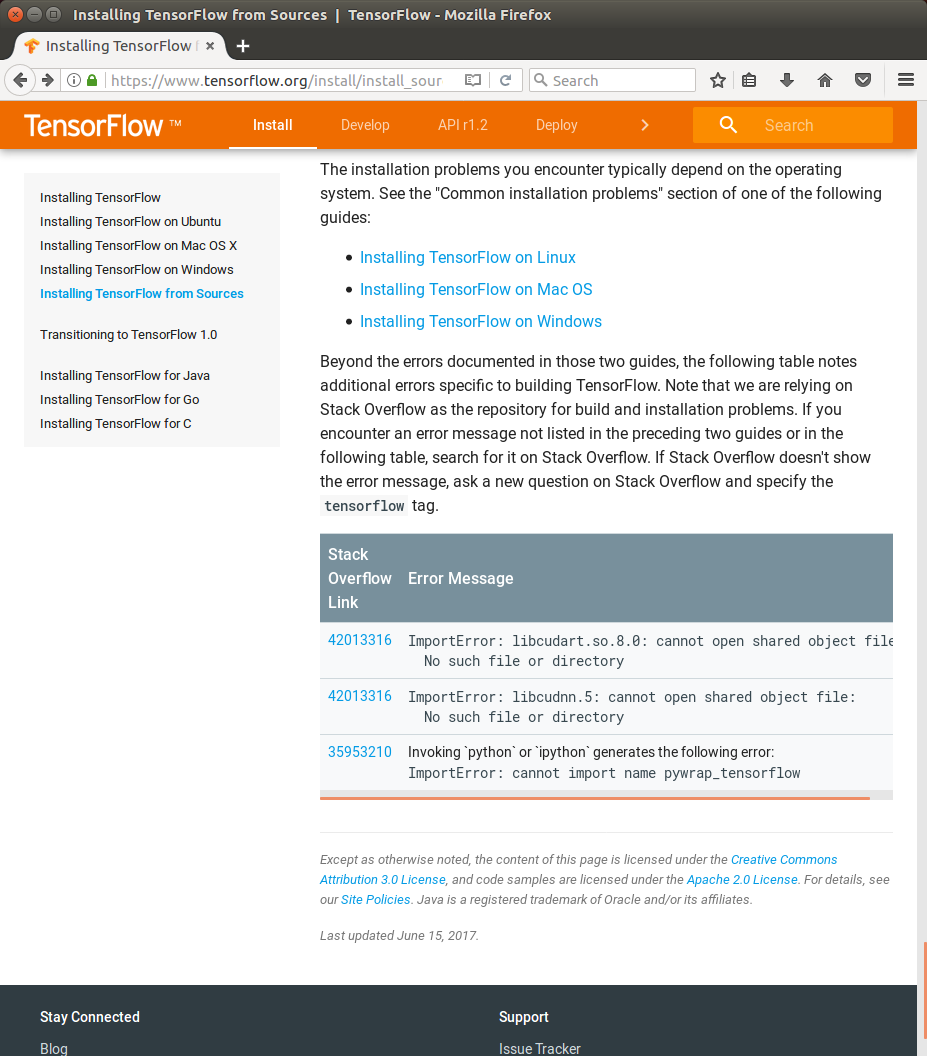
As you saw, in the above URL of officail site of tensorflow, you got Stack Overflow link which provide the resoultion that you'r running into
GPU back up of NVIDIA
But, the resolution that tensorflow's offering didn't work in my case,
Considering I didn't install NVIDIA requirements to run TnesorFlow with GPU support.
for GPU support, y'all demand :
-
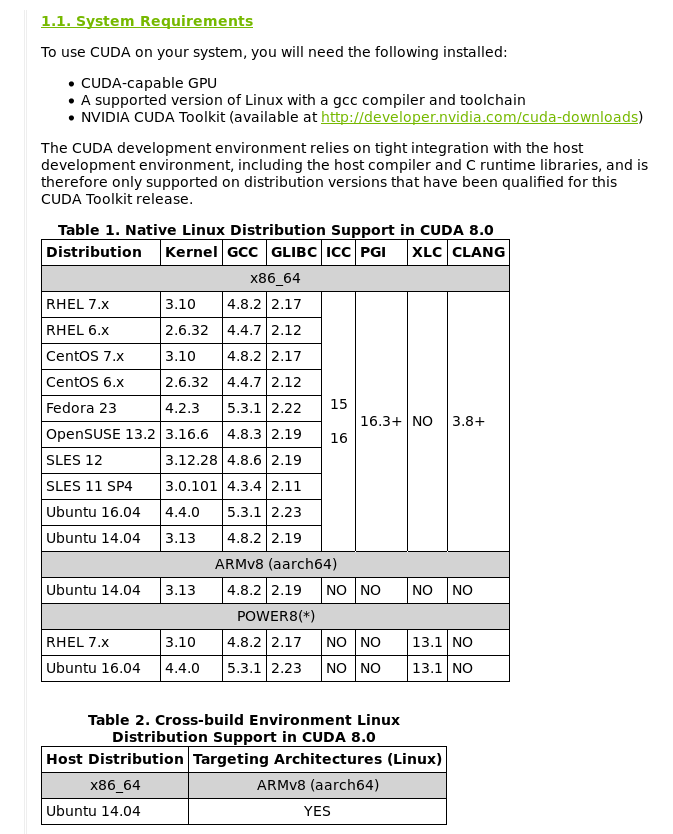
you demand CUDA® Toolkit 8.0 for this, yous need to read NVIDIA's documentation
-
you need to check if The NVIDIA drivers associated with CUDA Toolkit 8.0.
-
y'all demand cuDNN v5.i, for details, read VIDIA's documentation Simply you are unlike from version number of v5.i, depending on your system
-
you need to check your GPU card. y'all nee to read VIDIA's documentation for checking GPU with CUDA computer Adequacy 3.0 or higher.
-
The libcupti-dev library, in lodge to install this Library,
run the following command in bash :
sudo apt-get install libcupti-dev
Before install CUDA® Toolkit 8.0, let's exercise pre-installation Deportment.
- Verify the system has a CUDA-capable GPU
lspci | grep -i nvidia
hyunyoung2@hyunyoung2-desktop:~$ lspci | grep -i nvidia 01:00.0 VGA compatible controller: NVIDIA Corporation ......... 01:00.1 Audio device: NVIDIA Corporation ........ you can see system requirements to use GUDA on yous system, come across NVIDIA's documenataion
- verify the system is running a supported version of Linux
uname -m && cat /etc/*release
hyunyoung2@hyunyoung2-desktop:~$ uname -m && true cat /etc/*release x86_64 DISTRIB_ID =Ubuntu DISTRIB_RELEASE =16.04 ......... - verify the arrangement has gcc installed
gcc --version
hyunyoung2@hyunyoung2-desktop:~$ gcc --version gcc (Ubuntu 5.iv.0-6ubuntu1~16.04.iv) five.4.0 20220609 Copyright (C) 2022 Gratis Software Foundation, Inc. This is costless software; see the source for copying conditions. There is NO warranty; not even for MERCHANTABILITY or FITNESS FOR A Detail PURPOSE. - verify the system has the right kernel headers and evolution packages installed.
The post-obit control will detect out the version of kernel your system is running :
uname -r
hyunyoung2@hyunyoung2-desktop:~$ uname -r 4.8.0-36-generic the above is the version of the kernel headers and development packages that must be installed prior to installing the CUDA Drivers.
Let's install kernel headers and development package with the above command,
if you know about another system similar CentOS and and then on, click NVIDIA'south documentation
BUT in my case of Ubuntu
sudo apt-become install linux-headers-$(uname -r)
hyunyoung2@hyunyoung2-desktop:~$ sudo apt-get install linux-headers-$( uname -r ) Reading package lists... Done Building dependency tree Reading state information... Done linux-headers-4.8.0-36-generic is already the newest version (iv.8.0-36.36~16.04.one) . linux-headers-iv.8.0-36-generic set to manually installed. The following package was automatically installed and is no longer required: snap-confine Apply 'sudo apt autoremove' to remove it. 0 upgraded, 0 newly installed, 0 to remove and x non upgraded. I've installed CUDA Toolkit with runfile earlier, if you desire to know about this in detail, click NVIDIA's doucmentation
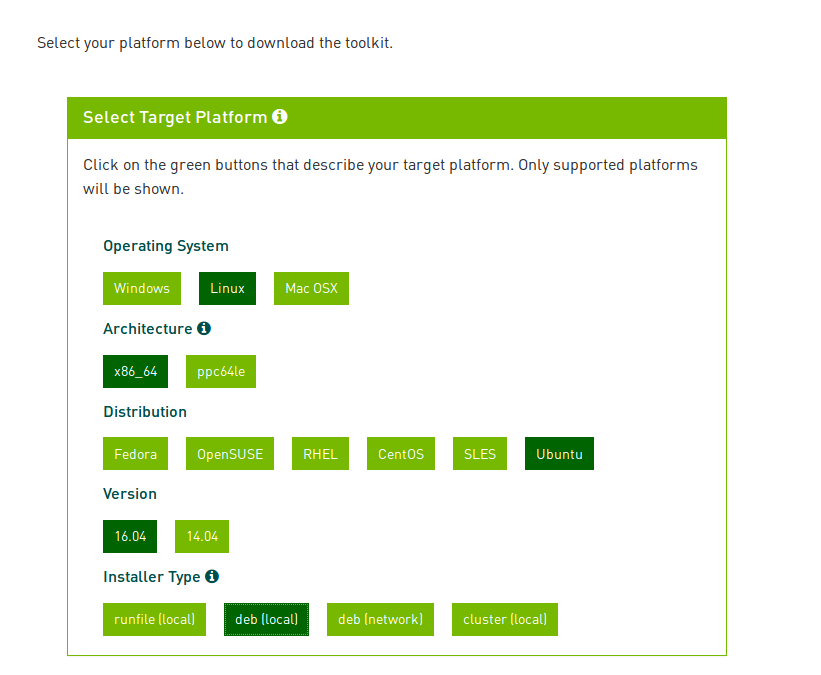
you can download CUDA Toolkit on here, cuda-download.
Just choose platform you are using and download the NVIDIA CUDA Tookit that contains the CUDA driver and tools.
The following is my choice of CUDA Toolkit
you lot need Download Verification with MD5 Checksum
md5sum <file>
hyunyoung2 @ hyunyoung2-desktop in ~/Downloads [eight:31:51] $ md5sum cuda-repo-ubuntu1604-8-0-local-ga2_8.0.61-1_amd64.deb d735c7fed8be0e72fa853f65042d5438 cuda-repo-ubuntu1604-eight-0-local-ga2_8.0.61-1_amd64.deb From now on, I will explaining Package Manager installation. if you desire to know most another package director installation, click Here
This way is much easier than runfile
procedure of installation :
First, Perform the pre-installation actions of NVIDIA'due south documentation
Sencond, install repositary meta-data
sudo dpkg -i cuda-repo-<distro>_<version>_<architecture>.deb
Third, Update the Apt repository cache
sudo apt-become update
Forth, install CUDA
sudo apt-get install cuda
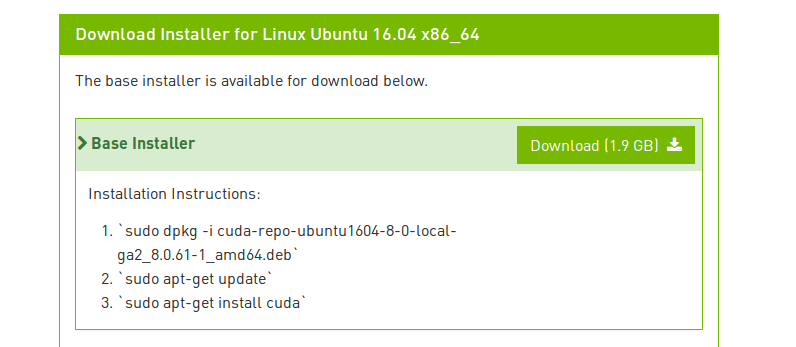
sudo dpkg -i cuda-repo-ubuntu1604-8-0-local-ga2_8.0.61-1_amd64.deb
# hyunyoung2 @ hyunyoung2-desktop in ~/Downloads [8:26:08] C:100 $ sudo dpkg -i cuda-repo-ubuntu1604-8-0-local-ga2_8.0.61-1_amd64.deb Selecting previously unselected package cuda-repo-ubuntu1604-eight-0-local-ga2. (Reading database ... 197423 files and directories currently installed.) Preparing to unpack cuda-repo-ubuntu1604-8-0-local-ga2_8.0.61-1_amd64.deb ... Unpacking cuda-repo-ubuntu1604-viii-0-local-ga2 (8.0.61-ane) ... Setting up cuda-repo-ubuntu1604-8-0-local-ga2 (8.0.61-1) ... OK sudo apt-get update
# hyunyoung2 @ hyunyoung2-desktop in ~/Downloads [8:27:37] C:1 $ sudo apt-get update Go:one file:/var/cuda-repo-viii-0-local-ga2 InRelease Ign:1 file:/var/cuda-repo-eight-0-local-ga2 InRelease Get:ii file:/var/cuda-repo-viii-0-local-ga2 Release [574 B] Get:2 file:/var/cuda-repo-eight-0-local-ga2 Release [574 B] Get:3 file:/var/cuda-repo-8-0-local-ga2 Release.gpg [819 B] Get:3 file:/var/cuda-repo-8-0-local-ga2 Release.gpg [819 B] ........ Fetched one,353 kB in 10s (129 kB/s) Reading package lists... Done sudo apt-go install cuda
# hyunyoung2 @ hyunyoung2-desktop in ~/Downloads [8:28:08] $ sudo apt-become install cuda Reading package lists... Done Edifice dependency tree Reading state information... Done The following parcel was automatically installed and is no longer required: snap-confine Use 'sudo apt autoremove' to remove information technology. The following boosted packages will be installed: bbswitch-dkms ca-certificates-java cuda-8-0 cuda-control-line-tools-8-0 cuda-core-8-0 ........ Processing triggers for initramfs-tools (0.122ubuntu8.8) ... update-initramfs: Generating /kicking/initrd.img-4.8.0-36-generic Processing triggers for dbus (1.10.6-1ubuntu3.3) ... Processing triggers for ureadahead (0.100.0-19) ... later the above processing, Perform Postal service-installation Deportment below
if you want to install CUDA Toolkit with runfile, yous demand to know how to execute text fashion of linux.
about the above matter, refer to this askubuntu
Post-installation Deportment
if yous want to read NVIDIA'southward documentation about post-installation actions, click HERE
Post_installation Actions have two ways :
-
Mandatory Activity : Environment Setup.
-
Recommended Actions : verify the installation.
Mandatory Activity
Some actions must be taken after the installation earlier the CUDA Toolkit and Driver tin be used.
- Surround Setup
The PATH variable needs to include > /usr/local/cuda-8.0/bin
In order to add this path to the PATH variable :
consign PATH=/usr/local/cuda-8.0/bin${PATH:+:${PATH}}

Below is to have to configure when you used the runfile installation method.
$ export LD_LIBRARY_PATH=/usr/local/cuda-8.0/lib64
${LD_LIBRARY_PATH:+:${LD_LIBRARY_PATH}}
In my example, I use oh my zsh, So I want to configure PATH on olny zsh.
On environment set up of oh my zsh
# hyunyoung2 @ hyunyoung2-desktop in ~ [nine:37:06] $ vim .zshrc # add together the line below in .zshrc file # exprot cuda export PATH =/usr/local/cuda-viii.0/bin${ PATH:+:${ PATH }} # To load the new PATH variable, log out from oh my zsh # hyunyoung2 @ hyunyoung2-desktop in ~ [9:39:03] C:127 $ go out hyunyoung2@hyunyoung2-desktop:~/Downloads$ zsh # hyunyoung2 @ hyunyoung2-desktop in ~/Downloads [9:39:58] $ Before configuring PATH variable, you tin't use nvcc –version like the following
hyunyoung2@hyunyoung2-desktop:~/Downloads$ nvcc --version The program 'nvcc' is currently not installed. You can install it past typing: sudo apt install nvidia-cuda-toolkit Subsequently configure PATH variable on .zshrc file, Now you can verify installation of CUDA
nvcc --version
# hyunyoung2 @ hyunyoung2-desktop in ~/Downloads [9:44:51] C:127 $ nvcc --version nvcc: NVIDIA (R) Cuda compiler driver Copyright (c) 2005-2016 NVIDIA Corporation Built on Tue_Jan_10_13:22:03_CST_2017 Cuda compilation tools, release eight.0, V8.0.61 So whether or not tensorflow-gpu works well,
python -c "import tensorflow every bit tf; print(tf.__version__)" # Ptyhon ii.7 python3 -c "import tensorflow equally tf; print(tf.__version__)" # Python 3.n
- python -c "import tensorflow as tf; impress(tf.__version__)" # Ptyhon 2.7
# hyunyoung2 @ hyunyoung2-desktop in /usr/local/cuda/bin [9:53:42] C:1 $ python -c "import tensorflow every bit tf; print(tf.__version__)" ......... ImportError: libcudnn.so.five: cannot open shared object file: No such file or directory ........ - python3 -c "import tensorflow as tf; print(tf.__version__)" # Python 3.northward
# hyunyoung2 @ hyunyoung2-desktop in /usr/local/cuda/bin [9:53:58] C:i $ python3 -c "import tensorflow equally tf; impress(tf.__version__)" Traceback (most recent call terminal): ......... ImportError: libcudnn.so.5: cannot open shared object file: No such file or directory During treatment of the above exception, another exception occurred: ......... ImportError: libcudnn.so.5: cannot open shared object file: No such file or directory ....... So from now on, You demand to install libcudnn, read NVIDIA's documentation
When you lot install libcudnn, specifically wait at the version of cuddn y'all need.
my case is the version number of 5, before download, you need to register NVIDIA Developer.
if yous download and uncompress thie file, cudnn-8.0-linux-x64-v5.0-ga.tgz
tar -xvzf ./cudnn-viii.0-linux-x64-v5.0-ga.tgz
# hyunyoung2 @ hyunyoung2-desktop in ~/Downloads [x:06:11] $ tar -xvzf ./cudnn-eight.0-linux-x64-v5.0-ga.tgz cuda/include/cudnn.h cuda/lib64/libcudnn.then cuda/lib64/libcudnn.then.5 cuda/lib64/libcudnn.and so.5.0.5 cuda/lib64/libcudnn_static.a yous need to move the whole files above into the lib64 and include directoies
# hyunyoung2 @ hyunyoung2-desktop in ~/Downloads [x:08:32] C:ane $ ls cuda cuda-repo-ubuntu1604-viii-0-local-ga2_8.0.61-1_amd64.deb cudnn-viii.0-linux-x64-v5.0-ga.tgz # hyunyoung2 @ hyunyoung2-desktop in ~/Downloads [10:08:41] $ cd cuda # hyunyoung2 @ hyunyoung2-desktop in ~/Downloads/cuda [10:08:44] $ ls include lib64 # hyunyoung2 @ hyunyoung2-desktop in ~/Downloads/cuda [10:12:19] $ sudo cp lib64/* /usr/local/cuda/lib64/ [ sudo ] password for hyunyoung2: # hyunyoung2 @ hyunyoung2-desktop in ~/Downloads/cuda [10:12:51] $ sudo cp include/* /usr/local/cuda/include/ Check if the files moved.
# hyunyoung2 @ hyunyoung2-desktop in ~/Downloads/cuda [10:13:05] $ ls include cudnn.h # hyunyoung2 @ hyunyoung2-desktop in ~/Downloads/cuda [10:13:19] $ ls lib64 libcudnn.so libcudnn.so.five libcudnn.then.five.0.five libcudnn_static.a # hyunyoung2 @ hyunyoung2-desktop in ~/Downloads/cuda [10:xiii:31] $ ls /usr/local/cuda/lib64 .......... libcudnn.so libcusparse.then.8.0.61 libnppim.then.8.0.61 libnvrtc-builtins.and then.8.0 libcudnn.so.5 libcusparse_static.a libnppi.so libnvrtc-builtins.so.8.0.61 libcudnn.and so.v.0.5 libnppc.then libnppi.and then.viii.0 libnvrtc.so libcudnn_static.a libnppc.so.8.0 libnppi.so.8.0.61 libnvrtc.then.8.0 .......... # hyunyoung2 @ hyunyoung2-desktop in ~/Downloads/cuda [10:13:45] $ ls /usr/local/cuda/include ....... cudnn.h math_functions_dbl_ptx3.hpp sm_32_intrinsics.hpp ....... Now check if tensorflow-gpu works well, Only information technology doesn't piece of work
Also you lot demand to chang LD_LIBRARY_PATH like this :
consign LD_LIBRARY_PATH=/usr/local/cuda-viii.0/lib64\
${LD_LIBRARY_PATH:+:${LD_LIBRARY_PATH}}

# hyunyoung2 @ hyunyoung2-desktop in ~ [9:37:06] $ vim .zshrc # exprot cuda export PATH =/usr/local/cuda-8.0/bin${ PATH:+:${ PATH }} consign LD_LIBRARY_PATH =/usr/local/cuda-8.0/lib64\ ${ LD_LIBRARY_PATH:+:${ LD_LIBRARY_PATH }} later the above configuration, tensorflow works well
# hyunyoung2 @ hyunyoung2-desktop in ~/Downloads [10:23:37] $ python -c "import tensorflow as tf; impress(tf.__version__)" 1.two.0 # hyunyoung2 @ hyunyoung2-desktop in ~/Downloads [ten:23:39] $ python3 -c "import tensorflow as tf; print(tf.__version__)" 1.2.0 Finally, allow's cheque if nvidia driver works well
Verify the installation
nvidia-smi
# hyunyoung2 @ hyunyoung2-desktop in /proc/commuter/nvidia [11:10:twoscore] $ nvidia-smi Tue Jun 27 11:12:25 2022 +-----------------------------------------------------------------------------+ | NVIDIA-SMI 375.66 Driver Version: 375.66 | |-------------------------------+----------------------+----------------------+ | GPU Name Persistence-M| Bus-Id Disp.A | Volatile Uncorr. ECC | | Fan Temp Perf Pwr:Usage/Cap| Memory-Usage | GPU-Util Compute 1000. | |===============================+======================+======================| | 0 GeForce GTX 1080 Off | 0000:01:00.0 On | N/A | | 0% 40C P8 11W / 230W | 447MiB / 8105MiB | 1% Default | +-------------------------------+----------------------+----------------------+ +-----------------------------------------------------------------------------+ | Processes: GPU Memory | | GPU PID Type Process name Usage | |=============================================================================| | 0 1070 Thousand /usr/lib/xorg/Xorg 290MiB | | 0 1759 G compiz 155MiB | +-----------------------------------------------------------------------------+ In order to verify the version, type
cat /proc/driver/nvidia/version
# hyunyoung2 @ hyunyoung2-desktop in /proc/driver/nvidia [11:13:55] C:1 $ true cat /proc/driver/nvidia/version NVRM version: NVIDIA UNIX x86_64 Kernel Module 375.66 Monday May ane 15:29:16 PDT 2022 GCC version: gcc version 5.4.0 20220609 (Ubuntu five.4.0-6ubuntu1~xvi.04.four) more specifically, in club to verify, run sampli source of NVIDIA.
cd /usr/local/cuda/bin
# hyunyoung2 @ hyunyoung2-desktop in /usr/local/cuda/bin [xi:17:47] $ ls bin2c cudafe++ cuda-memcheck nsight nvlink ptxas computeprof cuda-gdb cuobjdump nvcc nvprof crt cuda-gdbserver fatbinary nvcc.profile nvprune cudafe cuda-install-samples-8.0.sh gpu-library-advisor nvdisasm nvvp run cuda-install-sample-8.0.sh similar this :
cuda-install-samples-8.0.sh <dir>
<dir> means where yous want install instance sources of NVIDIA
in my case, I installed the source files into ~/sample directory
sudo ./cuda-install-samples-eight.0.sh ~/sample/
# hyunyoung2 @ hyunyoung2-desktop in /usr/local/cuda/bin [xi:17:48] $ sudo ./cuda-install-samples-8.0.sh ~/sample/ Copying samples to /dwelling/hyunyoung2/sample/NVIDIA_CUDA-eight.0_Samples now... Finished copying samples. # hyunyoung2 @ hyunyoung2-desktop in ~/sample [11:21:57] $ ls NVIDIA_CUDA-8.0_Samples move into NVIDIA_CUDA-8.0_Samples, complie any source file
in my case, I chose deviceQuery directory like this :
# hyunyoung2 @ hyunyoung2-desktop in ~/sample/NVIDIA_CUDA-8.0_Samples/1_Utilities/deviceQuery [11:24:45] $ ls deviceQuery.cpp Makefile NsightEclipse.xml readme.txt # hyunyoung2 @ hyunyoung2-desktop in ~/sample/NVIDIA_CUDA-8.0_Samples/1_Utilities/deviceQuery [eleven:24:48] C:two $ sudo brand /usr/local/cuda-8.0/bin/nvcc -ccbin g++ -I../../common/inc -m64 -gencode curvation =compute_20,lawmaking=sm_20 -gencode ......... cp deviceQuery ../../bin/x86_64/linux/release # hyunyoung2 @ hyunyoung2-desktop in ~/sample/NVIDIA_CUDA-viii.0_Samples/1_Utilities/deviceQuery [11:24:51] $ ls deviceQuery deviceQuery.cpp deviceQuery.o Makefile NsightEclipse.xml readme.txt # hyunyoung2 @ hyunyoung2-desktop in ~/sample/NVIDIA_CUDA-viii.0_Samples/1_Utilities/deviceQuery [11:25:34] $ ./deviceQuery ./deviceQuery Starting... CUDA Device Query (Runtime API) version (CUDART static linking) Detected i CUDA Capable device(south) Device 0: "GeForce GTX 1080" CUDA Driver Version / Runtime Version eight.0 / 8.0 CUDA Capability Major/Minor version number: 6.1 Full corporeality of global retentivity: 8106 MBytes (8499691520 bytes) (20) Multiprocessors, (128) CUDA Cores/MP: 2560 CUDA Cores GPU Max Clock charge per unit: 1823 MHz (1.82 GHz) Memory Clock rate: 5005 Mhz Memory Bus Width: 256-scrap L2 Cache Size: 2097152 bytes Maximum Texture Dimension Size (ten,y,z) 1D =(131072), 2d =(131072, 65536), 3D =(16384, 16384, 16384) Maximum Layered 1D Texture Size, (num) layers 1D =(32768), 2048 layers Maximum Layered 2D Texture Size, (num) layers 2D =(32768, 32768), 2048 layers Full amount of constant memory: 65536 bytes Total amount of shared memory per block: 49152 bytes Full number of registers bachelor per block: 65536 Warp size: 32 Maximum number of threads per multiprocessor: 2048 Maximum number of threads per block: 1024 Max dimension size of a thread block (ten,y,z): (1024, 1024, 64) Max dimension size of a filigree size (x,y,z): (2147483647, 65535, 65535) Maximum memory pitch: 2147483647 bytes Texture alignment: 512 bytes Concurrent copy and kernel execution: Aye with 2 copy engine(s) Run time limit on kernels: Yes Integrated GPU sharing Host Memory: No Support host page-locked retentivity mapping: Aye Alignment requirement for Surfaces: Aye Device has ECC support: Disabled Device supports Unified Addressing (UVA): Yes Device PCI Domain ID / Double-decker ID / location ID: 0 / ane / 0 Compute Mode: < Default (multiple host threads can use ::cudaSetDevice() with device simultaneously) > deviceQuery, CUDA Commuter = CUDART, CUDA Commuter Version = 8.0, CUDA Runtime Version = eight.0, NumDevs = 1, Device0 = GeForce GTX 1080 Result = PASS When you complete until completion of the whole processing above correctly.
your CUDA commuter works well. from now on, accept a fun with TensorFlow or CUDA.
Summary with commands to explain how to install tensorflow in Ubutu16.04
In my case, CUDA Toolkit eight.0, cuDNNv6.0, and Python3.5
$ sudo dpkg -i cuda-repo-ubuntu1604-8-0-local-ga2_8.0.61-1_amd64.deb $ sudo apt update $ sudo apt install cuda$ $ sudp dpkg -i cuda-repo-ubuntu1604-viii-0-local-cublas-performance-update_8.0.61-1_amd64.de $ sudo apt upgrade cuda $ sudo apt-get install python3-pip python3-dev python-virtualenv $ sudo dpkg -i libcudnn6_6.0.21-1+cuda8.0_amd64.deb OR sudo dpkg -i libcudnn6-dev_6.0.21-ane+cuda8.0_amd64.deb $ sudo pip3 install --upgrade tensorflow-gpu # As well y'all have to configure the path of file, "libcupti.so.8.0.". # put the path of the bottom of .bashrc like this : # For Tensorflow export LD_LIBRARY_PATH=/usr/local/cuda-8.0/extras/CUPTI/lib64/${LD_LIBRARY_PATH:+:${LD_LIBRARY_PATH}} consign PATH=/usr/local/cuda-8.0/bin${PATH:+:${PATH}} your installation of tensorflow-gpu is done with those commands.
apart from those commands, you lot don't need to practise anything.
Afterward those commands, bank check if tensorflow-gpu works well as follows:
# hyunyoung2 @ hyunyoung2-desktop in ~/Downloads [ii:10:12] $ python3 -c "import tensorflow as tf; print(tf.__version__)" one.4.0 As you tin can run across, yous identify the version of tensorflow-gpu.
Reference
-
Installing TensorFlow
-
Installing with native pip
-
mutual installation problems with Tensorflow
-
In guild to run TensorFlow with GPU support
-
Installing CUDA with runfile
-
how to insatll pip
-
How to insatll cudnn
-
how to change path of file for cudnn

Source: https://hyunyoung2.github.io/2017/06/27/How_To_Install_Tensorflow/
Posted by: baileyjakfam.blogspot.com
0 Response to "How To Check Tensorflow Installation"
Post a Comment