

How To Install Flask In Python
Introduction
Flask is one of the most popular web application frameworks written in Python. It is a microframework designed for an like shooting fish in a barrel and quick outset. Extending with tools and libraries adds more functionality to Flask for more circuitous projects.
This article explains how to install Flask in a virtual testing environment and create a simple Flask application.
Prerequisites
- Installed Python 2.7 or Python iii.5 and newer
- CLI with administrator privileges
Step i: Install Virtual Environment
Install Flask in a virtual environment to avoid bug with alien libraries. Bank check Python version before starting:
- Python 3 comes with a virtual surroundings module called venv preinstalled. If you lot have Python three installed, skip to Stride 2.
- Python 2 users must install the virtualenv module. If you lot accept Python ii, follow the instructions outlined in Step ane.
Install virtualenv on Linux
The parcel managers on Linux provides virtualenv.
- For Debian/Ubuntu:
i. Outset past opening the Linux terminal.
two. Apply apt to install virtualenv on Debian, Ubuntu and other related distributions:
sudo apt install python-virtualenv - For CentOS/Fedora/Scarlet Hat:
i. Open the Linux terminal.
two. Apply yumto install virtualenv on CentOS, Red Hat, Fedora and related distributions:
sudo yum install python-virtualenv Install virtualenv on MacOS
one. Open the terminal.
2. Install virtualenv on Mac using pip :
sudo python2 -1000 pip install virtualenv Install virtualenv on Windows
ane. Open the control line with ambassador privileges.
2. Utilize pip to install virtualenv on Windows:
py -2 -m pip install virtualenv Footstep ii: Create an Surround
1. Brand a separate directory for your project:
mkdir <project name> 2. Move into the directory:
cd <project name> 3. Inside the directory, create the virtual surroundings for Flask. When you create the environment, a new binder appears in your project directory with the environment's name.
Create an Surroundings in Linux and MacOS
- For Python iii:
To create a virtual environment for Python 3, use the venv module and give it a proper noun:
python3 -1000 venv <name of environment> - For Python 2:
For Python 2, use the virtualenv module to create a virtual surroundings and name information technology:
python -m virtualenv <name of environment> List the directory structure with the ls command shows the newly created environment:

Create an Surround in Windows
- For Python 3:
Create and proper name a virtual environment in Python iii with:
py -iii -grand venv <name of environment> - For Python 2:
For Python two, create the virtual environment with the virtualenv module:
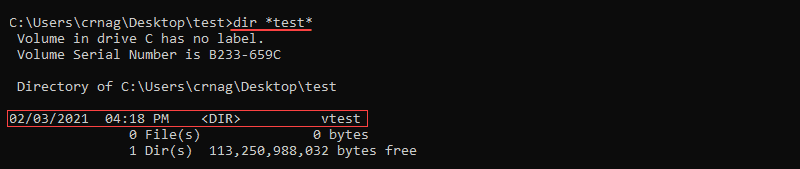
py -ii -m virtualenv <proper noun of surroundings> List the folder structure using the dir command:
dir *<project name>* The project directory shows the newly created environment:
Footstep 3: Activate the Environs
Activate the virtual environment before installing Flask. The name of the activated environs shows up in the CLI after activation.
Actuate the Surroundings on Linux and MacOS
Activate the virtual environment in Linux and MacOS with:
. <proper name of surroundings>/bin/activate 
Activate the Environment on Windows
For Windows, activate the virtual environment with:
<name of environment>\Scripts\activate 
Step 4: Install Flask
Install Flask inside the activated environment using pip :
pip install Flask Flask is installed automatically with all the dependencies.
Step 5: Test the Development Environment
1. Create a elementary Flask application to test the newly created development environment.
2. Make a file in the Flask project binder called how-do-you-do.py.
three. Edit the file using a text editor and add the following code to make an application that prints "Hello globe!":
from flask import Flask app = Flask(__name__) @app.route('/') def hello_world(): return 'Hello earth!' Note: Pick whatsoever name for the project except flask.py. The Flask library is in a flask.py file.
4. Salve the file and shut.
5. Using the console, navigate to the project binder using the cd command.
6. Fix the FLASK_APP environs variable.
- For Linux and Mac:
export FLASK_APP=hello.py - For Windows:
setx FLASK_APP "hi.py" 7. Run the Flask application with:
flask run 
The output prints out a confirmation bulletin and the address.
8. Re-create and paste the accost into the browser to run across the project running:

Determination
Flask web applications are piece of cake to configure and run. It is one of the nearly popular web application frameworks for Python.
Read nearly the best Python IDEs and code editors to cull the best environment for further spider web development with Flask.
Was this article helpful?
Yeah No

Source: https://phoenixnap.com/kb/install-flask
Posted by: baileyjakfam.blogspot.com
0 Response to "How To Install Flask In Python"
Post a Comment